This article was first written in 1996. As you read it you will see that it's focus was centered on film photography. Obviously since that time, digital photography has nearly replaced film, however many of the same principles apply, just a little differently. For example film"grain" is now digital "noise". All of the information regarding the construction and use of the mount are unchanged regardless of the photographic medium however. So whether you shoot film or digital, I hope you enjoy the article. -Rod
This simple device is a great way to get started in Astrophotography. It is easily assembled from readily available materials, and produces some very rewarding results. It's function is to move the camera to compensate for the rotation of the Earth thus preventing the trailing of stars in the photos.
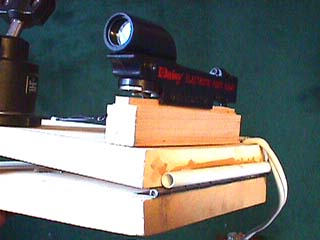
As you can see, there isn't much to this thing. Two boards, hinged on one end, with a 1/4 20 bolt running through a Tee nut. Position the hole for the tee nut exactly 292mm from the center of the hinge. I chose to buy a ball head adapter, but those of you with a little imagination and skill can probably avoid the $30 expense by designing something to hold the camera yourself.You will see in the photo that I chose to motorize the mount. This motor is a 1 rpm AC motor (more details below) that I power with a battery and inverter. You may attach a handle to the bolt and turn it by hand if you choose. The concept is that the bolt must turn once a minute. Some simply watch the sweep second hand on their watch and approximate that motion with the handle position. The precision of this action becomes more important as you increase the focal length of the lens in use, as errors become more evident. I find the motor is a great solution to this situation. It turns precisely once a minute, and allows me to do other things while the system works by itself.
How To Use the Mount
To use the mount you simply place it on a tripod, with the hinge to the west. Adjust the tripod so that the axis of the hinge points at the North Star, Polaris, or more precisely 3/4 of a degree offset. I won't discuss the finer points of polar alignment here, but there are many sources of information available. As you can see, I have 2 methods for attaining this alignment. The first is a very simple one. I simply gutted a pen and glued the tube to the mount parallel to the hinge. Simply sight through the tube until you get Polaris in view and you are relatively well aligned. The second method utilizes the Daisy BB gun sight you see in the photo. This unit "projects" a red dot in a window that then appears to project into the sky when viewing through the window. With this device, once properly aligned with the mount, I can simply place the red dot in the appropriate position and I am polar aligned. The Daisy sight is about $15 at sporting good stores.
Once you are polar aligned, mount the camera and aim the camera at the target, open the lens wide open and focus at infinity. I suggest that you use a cable release to trigger the camera, set on the "bulb" shutter speed. If you are using the hand turned method, you will begin to turn the bolt. If you have motorized the mount, I suggest that you have the motor running before tripping the shutter. Once you have reached your intended exposure time, simply close the shutter.
Regarding exposure times. I find it best to vary the exposure times. I usually start a about 1 minute and continue to double the time to 2 minutes, 4 minutes, etc. You can make them anything you want, but definately vary the times and take multiple exposures. It should be stated that this mount will not support extremely long exposures. Many issues contribute to this situation. First the nature of the design is such that errors in tracking will occur after a certain point. Second, the length of the lens in use can magnify these errors. A longer lens will show errors more quickly. I have used a 135mm lens for exposures of up to 6 minutes without objectionable errors, but I believe that is about the limit. Longer lenses, 200mm for instance, shorten the error free exposure times to the point where the resulting images usually do not show enough detail to be rewarding in my opinion.
I would suggest that anyone starting out try a 50mm or wider lens for at least some of the initial attempts. I find the wide field views and the wealth of items that show up in these photos to be extremely interesting and easy to do.
Films
Obviously with our limit on exposure times, film speed becomes very important. Using 800 ISO film exposed for 2 minutes captures as much light as 200 ISO film exposed for 8 minutes. Since we know that we begin to see tracking errors at about 6-8 minutes, we need to grab as many photons as soon as possible. The difficulty is that as we increase the speed of the film, we increase the "grain" of the film. Opinions as to what is acceptable in this area varies greatly from individual to individual. I have had great success with Fuji 800g and Konica 3200.
I have found that the Fuji film provides good grain characteristics along with good speed. It seems to have a slight leaning towards the blue end of the spectrum, but it is not objectionable and can be adjusted in printing.
The Konica film is really a great film for widefield shots. It is so fast that it picks up an unbelievable number of stars and other features in a short time. It seems to be really sensitive to the red end of the spectrum, which can be ideal for many nebula.
Equipment
Any 35mm camera that allows for holding the shutter open via a "bulb" or "time" setting can be used. Some of the modern cameras can pose a bit of a problem though as a result of their electronic shutters. It seems that these cameras consume battery power in order to hold the shutter open. This can cause some to exhaust the batteries during the long exposures, especially during cold weather. The solution if you own one of these cameras is to carry extra batteries or get a camera with a mechanical shutter
Regarding lenses. Another aspect to gathering as much light as possible as soon as possible is to use a "fast" lens. Many 50mm lenses sold as standard equipment are f1.4 to f2.0 making them ideal for our purposes. Longer lenses like 100mm or 135mm are available in anything from f2.0 to f4.5, most fall in the f2.8 to f3.5 range. The faster are better than the slower, remember we want to gather as much light as soon as possible. The good news is a that many of these lenses are finding their way to the local used market as more and more people move to autofocus. They are usually available for less than $100 and often for much less.
Zoom lenses, while usable, generally sacrifice a couple of things. First they are generally slower than their single focal length counterparts. Second, the are usually less sharp at the edges of the field. While this might not be noticed in general photography, stars, being the tiny point of light they are, have a way of bringing to light all of the shortcomings of lenses.
With regards to tripods, the sturdier the better, especially if you are hand turning the mount. A simple tilt head will work just fine, as all you require of it is that it can adjust to point the mount at the North Star. My own experience has taught me that there is no such thing as a cheap AND sturdy tripod, and that there is little as frustrating as a bad one. Look at the expenditure as a life time investment, as a good one can be.
Use a cable release to avoid shaking the camera while releasing the shutter.
Processing Your Photos
This portion of the process will take some patience on your part. Most photo processing companies will take a look at your negatives and assume that you took some pretty dark pictures and try to compensate by printing your pictures way too light. The best solution is to find a local one hour processor at which you can talk to the operator and advise them as to the nature of your photos. If possible have them print a single negative using the entire range of settings on their machine (usually 5 or 6) then choose the one that is most pleasing.
Pointers
Take care when doing the polar alignment. Small errors here can have significant effect on the photos.
Take along a watch with at least a sweep second hand. I prefer to use a cheap electronic stop watch to time the exposures
Get out away from the city lights. Sky glow will ruin your photos.
Careful when walking near your tripod during exposures. I have had photos ruined by vibrations transmitted to the tripod by people walking around nearby.
If you motorize the mount, attach a small "flag" of masking tape to the end of the drive screw. This allows you to confirm that the drive is working with a quick glance at the turning flag.
Try many different exposure times for each shot, and write them down. This will help you keep track of your successes and your Astronomy friends will want to know these details.
Don't be discouraged with failures. All of us who have attempted this process have had failures, but the successes are very rewarding.
Construction Details
The mount I constructed is motorized. The motor was sourced from American Science and Surplus for about $2.50 and is a 1 rpm AC motor. I am not aware of a stock number, but the motor is marked as follows: Singer Controls Division Model 414 349-20 115v 60 hz 3W 1 RPM CW. It comes with a small gear that I slide a short section of 1/4" tubing over and slide the other end over the ground down head of a 1/4 20 carriage bolt. This provides the "coupling" of the motor to the drive bolt. Simple but effective. I find that this works well for exposures up to about 14 minutes. At that point the system begins to bind. To avoid that, I simply detach the tube and reset the bolt to the starting position after long exposures.

When measuring the placement of the hole for the drive bolt tee nut, take the time to do it accurately. Misplacement of the hole will be the source of errors in your photos.
Use a sturdy hinge. Avoid piano hinges as the ones I have seen do not seem to be very sturdy.
I mounted the ball mount in the center of the length of the board towards the front. The position of the ball on the board does not matter, but if it is your intention to use a heavier medium format camera, mounting the ball adapter closer to the hinge might reduce the load on the motor to some degree.
In some orientations the camera can be difficult to position exactly where you want it. It might help to include a spacer block under the Ball mount to provide additional height to allow the camera to swing freely to any orientation.
To power the mount in the field, I use a 12v 4 amp hour gel cell battery attached to an inverter providing 110v AC output. I have used this all night without approaching exhausting the battery. Obviously if you have access to AC power at your dark site location use it.
Attaching the mount to the tripod is accomplished with a 1/4 20 Tee nut in the bottom board. Anywhere is fine, I centered mine.
Photos
Here are a few shots taken with this rig
North America Nebula

California Nebula

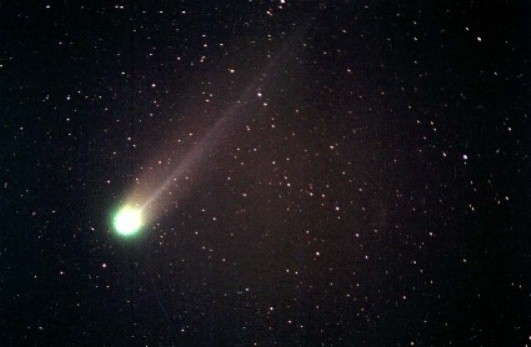
Comet Hyakutake
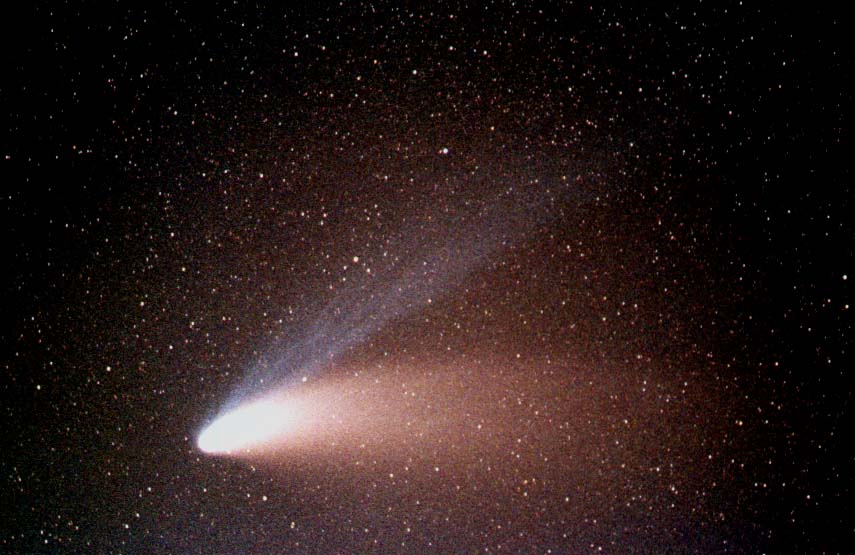
Comet Hale Bopp